

Staring at Blender’s interface for the first time feels like stepping into a spaceship cockpit without a manual. That’s exactly how millions of beginners feel when learning how to use Blender, the free 3D powerhouse that’s both intimidating and incredibly rewarding. The good news? You don’t need to master everything at once—most creators use just 20% of Blender’s features for 80% of their work. This guide cuts through the complexity to get you creating real 3D projects within hours, not weeks.
Blender’s learning curve has flattened dramatically since its early days, thanks to community efforts and intuitive workflows. Whether you’re designing 3D prints, creating animations, or exploring visual effects, this guide delivers exactly what you need to start building confidence with the software. Forget overwhelming theory—we’re jumping straight into actionable steps that produce visible results from your very first session.
Download Blender Without Security Risks
Avoid Malware by Using Official Sources Only
Never download Blender from third-party sites—these often bundle dangerous malware with the installer. Head directly to blender.org, where you’ll see a prominent blue download button at the top of the homepage. The site automatically detects your operating system, but verify you’re downloading the correct version (2.93.5 or newer) before proceeding. Save the installer to your desktop for quick access and future reference.
Verify Your Graphics Card Compatibility
Before installing, check if your hardware can handle modern Blender versions. NVIDIA users need GeForce 400 series or newer (including all RTX cards). AMD users must have GCN 1st generation or newer—Terascale 2 cards no longer work with recent versions. Intel integrated graphics require Haswell architecture or newer. Mac users need macOS 10.13+ for Intel processors or macOS 11.0+ for Apple Silicon. If your hardware falls short, consider older Blender versions (2.79) which still offer substantial functionality.
Navigate the Interface in 10 Minutes
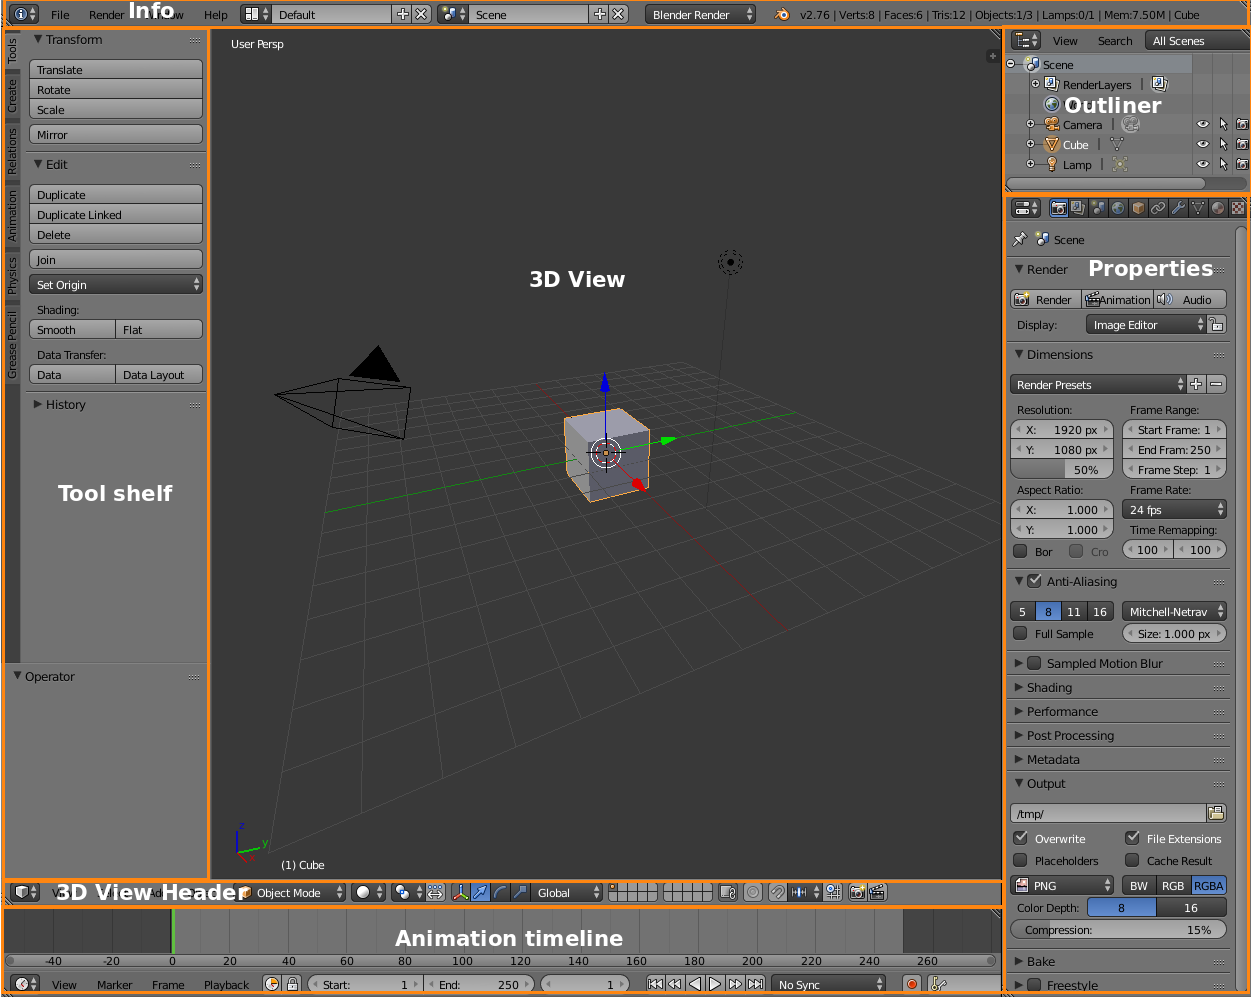
Master Essential Workspace Layouts Immediately
Blender opens with a default layout that seems overwhelming but becomes intuitive with minimal practice. The large central area is your 3D Viewport—this is where you’ll spend 80% of your time creating. The Outliner (top right) shows all objects in your scene, while the Properties panel (bottom right) controls materials and rendering. The Timeline (bottom) handles animation sequences.
Critical areas to learn first:
– 3D Cursor: Your object creation point (press Shift+S to snap to center)
– Transform Widgets: Red/Green/Blue arrows for precise movement
– Viewport Shading Menu: Switch between Solid, Wireframe, and Rendered views
– Object Mode vs. Edit Mode: Fundamental workflow distinction
Learn Navigation Shortcuts That Save Hours
Forget menu hunting—Blender’s mouse navigation is fluid once mastered. Middle mouse button rotates your view, Shift+middle mouse pans, and mouse wheel zooms. For precise angles, use number pad shortcuts: 1 (front view), 3 (side view), 7 (top view), 5 (toggle perspective/orthographic). Pro tip: Enable “Emulate Numpad” in Preferences > Input if you lack a number pad—this lets you use regular number keys for navigation.
Create and Modify Your First 3D Model
Start with Basic Shapes Using Hotkeys
Delete the default cube by pressing X and confirming. Press Shift+A to open the Add menu, then select Mesh → UV Sphere to create your first object. Notice how it appears exactly where your 3D cursor sits—position this first using Shift+click. This simple workflow (delete → add → position) forms the foundation of all modeling.
Transform Objects with Precision Control
Master these transformation hotkeys immediately:
– G (Grab/Move): Press G then X/Y/Z for axis-specific movement
– S (Scale): Type numbers after pressing S for exact scaling (S 0.5 = 50% size)
– R (Rotate): R 45 rotates 45 degrees; R Z 90 rotates vertically
Avoid this common mistake: Forgetting to apply transformations before exporting. After scaling or rotating, press Ctrl+A and select “Scale” or “Rotation” to lock these changes—otherwise your model may appear distorted in other applications.
Complete the Donut Tutorial in One Sitting
Follow Andrew Price’s Industry-Standard Project
The Blender Guru donut tutorial remains the single most effective way to learn how to use Blender comprehensively. This 2-hour project teaches core competencies while building something visually rewarding. You’ll progress through modeling the donut shape, adding frosting details, applying realistic materials, setting up proper lighting, and rendering your final image—all essential skills for any 3D project.
Critical phases to focus on:
– Modeling: Extruding geometry to create the donut shape
– Materials: Creating realistic sugar and chocolate textures
– Lighting: Setting up three-point lighting for professional results
– Rendering: Configuring Cycles engine for photorealistic output
Document Your Learning Process
Keep detailed notes as you complete the tutorial—these become invaluable references later. Take screenshots of each completed stage and save incremental .blend files. When you encounter confusing steps, pause and experiment with variations before proceeding. This hands-on approach cements your understanding far better than passive watching. Most beginners complete the tutorial in 2-4 hours with proper focus.
Import Free Models for Practice
Download Starter Models from TurboSquid
TurboSquid (now part of Shutterstock) offers six excellent free models perfect for beginners: school bus, crystals, ice cream cart, keys, origami crane, and Mayan pyramid. These provide realistic objects to practice importing, scaling, and integrating into scenes without modeling from scratch.
Import Models Without Common Errors
Navigate to File → Import → Wavefront (.obj) for most free models. After selecting your file, the model appears at the origin point—often too large or small. Press S to scale it down (type 0.01 for 1% size) or up as needed. Crucial step: Press Ctrl+A → Scale to apply this transformation before moving the object, otherwise it may distort when animated or exported.
Edit Videos Using Blender’s Built-in Tools

Activate the Video Sequence Editor Workspace
Switch from 3D view to Video Editing using the workspace tabs at the top. This reveals Blender’s surprisingly capable non-linear editor. Import clips by pressing Shift+A → Movie, then drag them onto the timeline. The interface resembles professional video editors like Premiere Pro but with Blender’s unique workflow.
Perform Essential Editing Tasks Quickly
Make precise cuts: Position playhead, select clip, press K to split at cursor. Add transitions: Overlap clips slightly for automatic crossfades. Color grade: Use the Properties panel to adjust exposure, contrast, and saturation. Export properly: Choose FFmpeg video with H.264 codec and “Perceptually lossless” quality for web sharing—this balances quality and file size effectively.
Optimize Your Render Settings
Choose Appropriate Output Formats
For 3D models: Use .obj for universal compatibility or .stl for 3D printing. For animations: Export as .mp4 with H.264 encoding. For still images: Save as .png if you need transparency or .jpg for smaller file sizes. Always create a dedicated “renders” folder before starting to keep your projects organized.
Balance Quality and Render Time
Start with 64 samples for quick test renders (takes seconds), then increase to 256+ samples for final output (may take minutes). Set resolution to 1920×1080 for HD quality—jumping to 4K quadruples render time with minimal visual improvement for most projects. Pro tip: Enable “Denoising” in the render settings to clean up grainy renders without increasing sample counts.
Fix Common Beginner Problems Fast
Solve Interface Disasters in Seconds
Accidentally closed a panel? Drag from window corners to recreate it. Lost your 3D view? Press Ctrl+Space to toggle full-screen mode. Completely confused? Reset to defaults via File → Defaults → Load Factory Settings. These quick fixes prevent frustration when learning how to use Blender’s complex interface.
Troubleshoot Black or Slow Renders
Black renders: Check if your camera exists (press 0 to view through it) and points at your scene. Slow viewport performance: Switch from “Rendered” to “Solid” viewport shading. Missing textures: Ensure image files remain in their original folders—Blender can’t find relocated texture files. Memory crashes: Enable “Simplify” in Scene Properties to reduce geometry during complex operations.
Build Your First Complete Scene
Plan a Simple, Achievable Project
Start with something manageable like a coffee cup on a table—not an entire cityscape. Set realistic goals: A single well-executed object beats a poorly finished complex scene. Work in real-world scale where 1 Blender unit = 1 meter—this prevents bizarre scaling issues when importing/exporting models.
Execute Your Project Step-by-Step
- Model: Create basic shapes using extrusions and subdivisions
- Position: Arrange objects using reference images as backgrounds
- Light: Implement three-point lighting (key, fill, backlight)
- Material: Apply simple colors before attempting complex textures
- Render: Test with low samples first, then increase for final output
Final Note: Your journey learning how to use Blender begins with that first donut tutorial but continues through daily micro-projects. Within two weeks of consistent practice, you’ll navigate the interface instinctively and tackle increasingly complex creations. Remember that every Blender expert started exactly where you are now—confused but curious. The software’s free nature means there’s zero risk in experimenting, so open Blender today and create something, however small. Your first completed project, no matter how simple, marks the true beginning of your 3D journey.

