

Ever wonder how your countertop blender transforms whole fruits, ice cubes, and vegetables into silky smooth mixtures in seconds? The answer lies not in magic but in precisely engineered mechanics that convert electrical energy into culinary perfection. When you press that power button, a sophisticated system springs to life—spinning blades, controlled vortexes, and safety mechanisms working in perfect harmony. Understanding how does the blender work will transform your kitchen results, help troubleshoot common issues, and extend your appliance’s lifespan. By the end of this guide, you’ll know exactly what happens inside that jar and how to leverage this knowledge for restaurant-quality results every time.
The Six Critical Components Behind Smooth Blending
Your blender’s ability to create perfect textures depends on six precisely engineered components working together as a sealed system. Each piece plays a specific role in transforming solid ingredients into liquid perfection, from the weighted base that anchors the unit during high-speed operation to the multi-plane blades that slice through frozen berries like they’re room temperature.
Lid and Feeder Cap Safety System
The lid isn’t just a cover—it creates an essential airtight seal that prevents explosive messes during high-speed blending. Most models feature a removable feeder cap that serves a dual purpose: it allows you to add ingredients mid-blend without stopping the motor, and often doubles as a convenient measuring cup. This small plastic piece is engineered to maintain pressure balance inside the jar, preventing dangerous pressure buildup while letting you customize your recipes on the fly. Never operate your blender without the lid properly secured—this safety feature prevents 90% of kitchen accidents involving blenders.
Jar Shape Science for Optimal Flow
Tapered jar designs aren’t just for aesthetics—they’re engineered for performance. The angled walls create a natural funneling action that guides ingredients downward toward the blades, eliminating dead zones where food could hide unblended. This shape is critical for vortex formation, the swirling motion that ensures every piece of food receives equal cutting action. When selecting a blender, choose one with a jar that narrows significantly toward the bottom—the steeper the angle, the more efficient the blending process becomes as ingredients continuously circulate back toward the blades.
Multi-Angle Blade Engineering
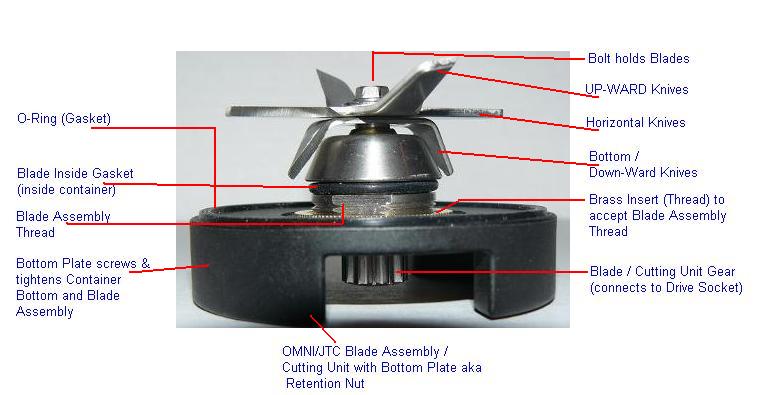
Four stainless steel blades arranged at different angles create what engineers call a “multi-plane cutting system.” This configuration ensures ingredients can’t escape the cutting action, whether you’re processing rock-hard ice or delicate herbs. The blades maintain their sharpness through repeated use thanks to hardened steel construction that resists chipping and dulling. Notice how the blades aren’t all on the same plane—they’re positioned at varying heights and angles to maximize contact with ingredients as they circulate through the vortex. This sophisticated arrangement is why professional blenders outperform cheaper models with simple two-blade systems.
Motor Mechanics That Drive Blending Power

Hidden beneath the sleek exterior, your blender’s motor transforms electricity into mechanical force through a sophisticated drive system. This powerhouse component determines how effectively your blender handles everything from crushing ice to emulsifying dressings, with the right motor making the difference between smooth success and chunky disappointment.
Coupler Connection System Explained
The coupler—sometimes called the clutch or serrated drive—protrudes from the motor housing and locks into the blade assembly when you position the jar correctly. This critical connection transfers rotational force from the motor to the blades while allowing easy jar removal for cleaning. When you set the jar on the base, you’ll feel a slight resistance followed by a satisfying “click” as the coupler engages with the blade assembly. This system also accommodates speed variations, letting you pulse through tough ingredients or maintain steady speeds for delicate emulsions. If your blender won’t operate, check that the jar is properly aligned—most safety systems prevent operation if the jar isn’t correctly seated.
Speed Control Technology for Texture Precision
Variable speed motors give you control over texture outcomes through selectable settings. Most quality blenders offer distinct functions: chop, grate, grind, blend, mix, stir, puree, whip, and liquefy. Higher speeds generate finer textures by increasing blade contact frequency, while lower settings preserve chunkier consistencies perfect for salsas and relishes. The secret to professional results lies in understanding that speed selection isn’t arbitrary—it’s directly tied to ingredient type and desired outcome. For example, start with low speeds when making chunky tomato salsa, then gradually increase for silky-smooth soups. Never exceed recommended speeds for your specific model, as this can cause motor overheating and premature wear.
Vortex Physics That Creates Perfect Consistency
The mesmerizing spiral you see inside your blender jar isn’t just visual—it’s the critical vortex formation process that ensures even blending. This natural phenomenon follows predictable physics principles that professional chefs leverage for consistent restaurant-quality results every time.
Vacuum Effect for Even Processing
When blades rotate at high speed, they create a low-pressure zone at the jar’s center, generating a vacuum effect that pulls heavier ingredients downward while lighter particles circulate upward. This continuous circulation ensures every piece of food receives equal cutting action, preventing the common problem of over-processed bottom layers and chunky top sections. The vortex forms a shallow well at the center of the jar, with ingredients spiraling downward along the jar’s tapered walls, then being forced upward around the sides as they blend. This natural circulation pattern is why you rarely need to stop and stir when using a properly engineered blender.
Air Incorporation for Professional Texture
The whipping action of high-speed blades introduces controlled amounts of air into your mixtures, creating the frothy textures perfect for smoothies and milkshakes. This aeration occurs naturally during blending but can be minimized for denser preparations like hummus or nut butter by reducing blending time and speed. Understanding how does the blender work reveals why professional chefs sometimes add a splash of cold water to thick mixtures—to facilitate vortex formation and ensure even processing without excessive air incorporation. The key is recognizing when you want that airy texture (for frozen drinks) versus when you need dense, creamy results (for dips and spreads).
Pre-Operation Setup That Prevents 90% of Problems
Proper preparation before blending prevents most common issues before they occur. Following these steps ensures both safety and optimal performance, whether you’re making a quick post-workout smoothie or preparing party-sized batches for guests.
Safety Check Protocol You Must Follow
Always verify your blender is unplugged, clean, and completely dry before starting. Check blade sharpness and gasket integrity—worn seals cause leaks that can damage the motor housing. Ensure the base sits level on your counter to prevent dangerous vibration-induced movement during high-speed operation. Never operate with wet hands or near water sources, and always confirm the housing and jar are securely connected—most safety systems prevent operation if components aren’t properly aligned. This simple pre-blend checklist takes less than 30 seconds but prevents most blender-related kitchen accidents.
Strategic Ingredient Loading Techniques
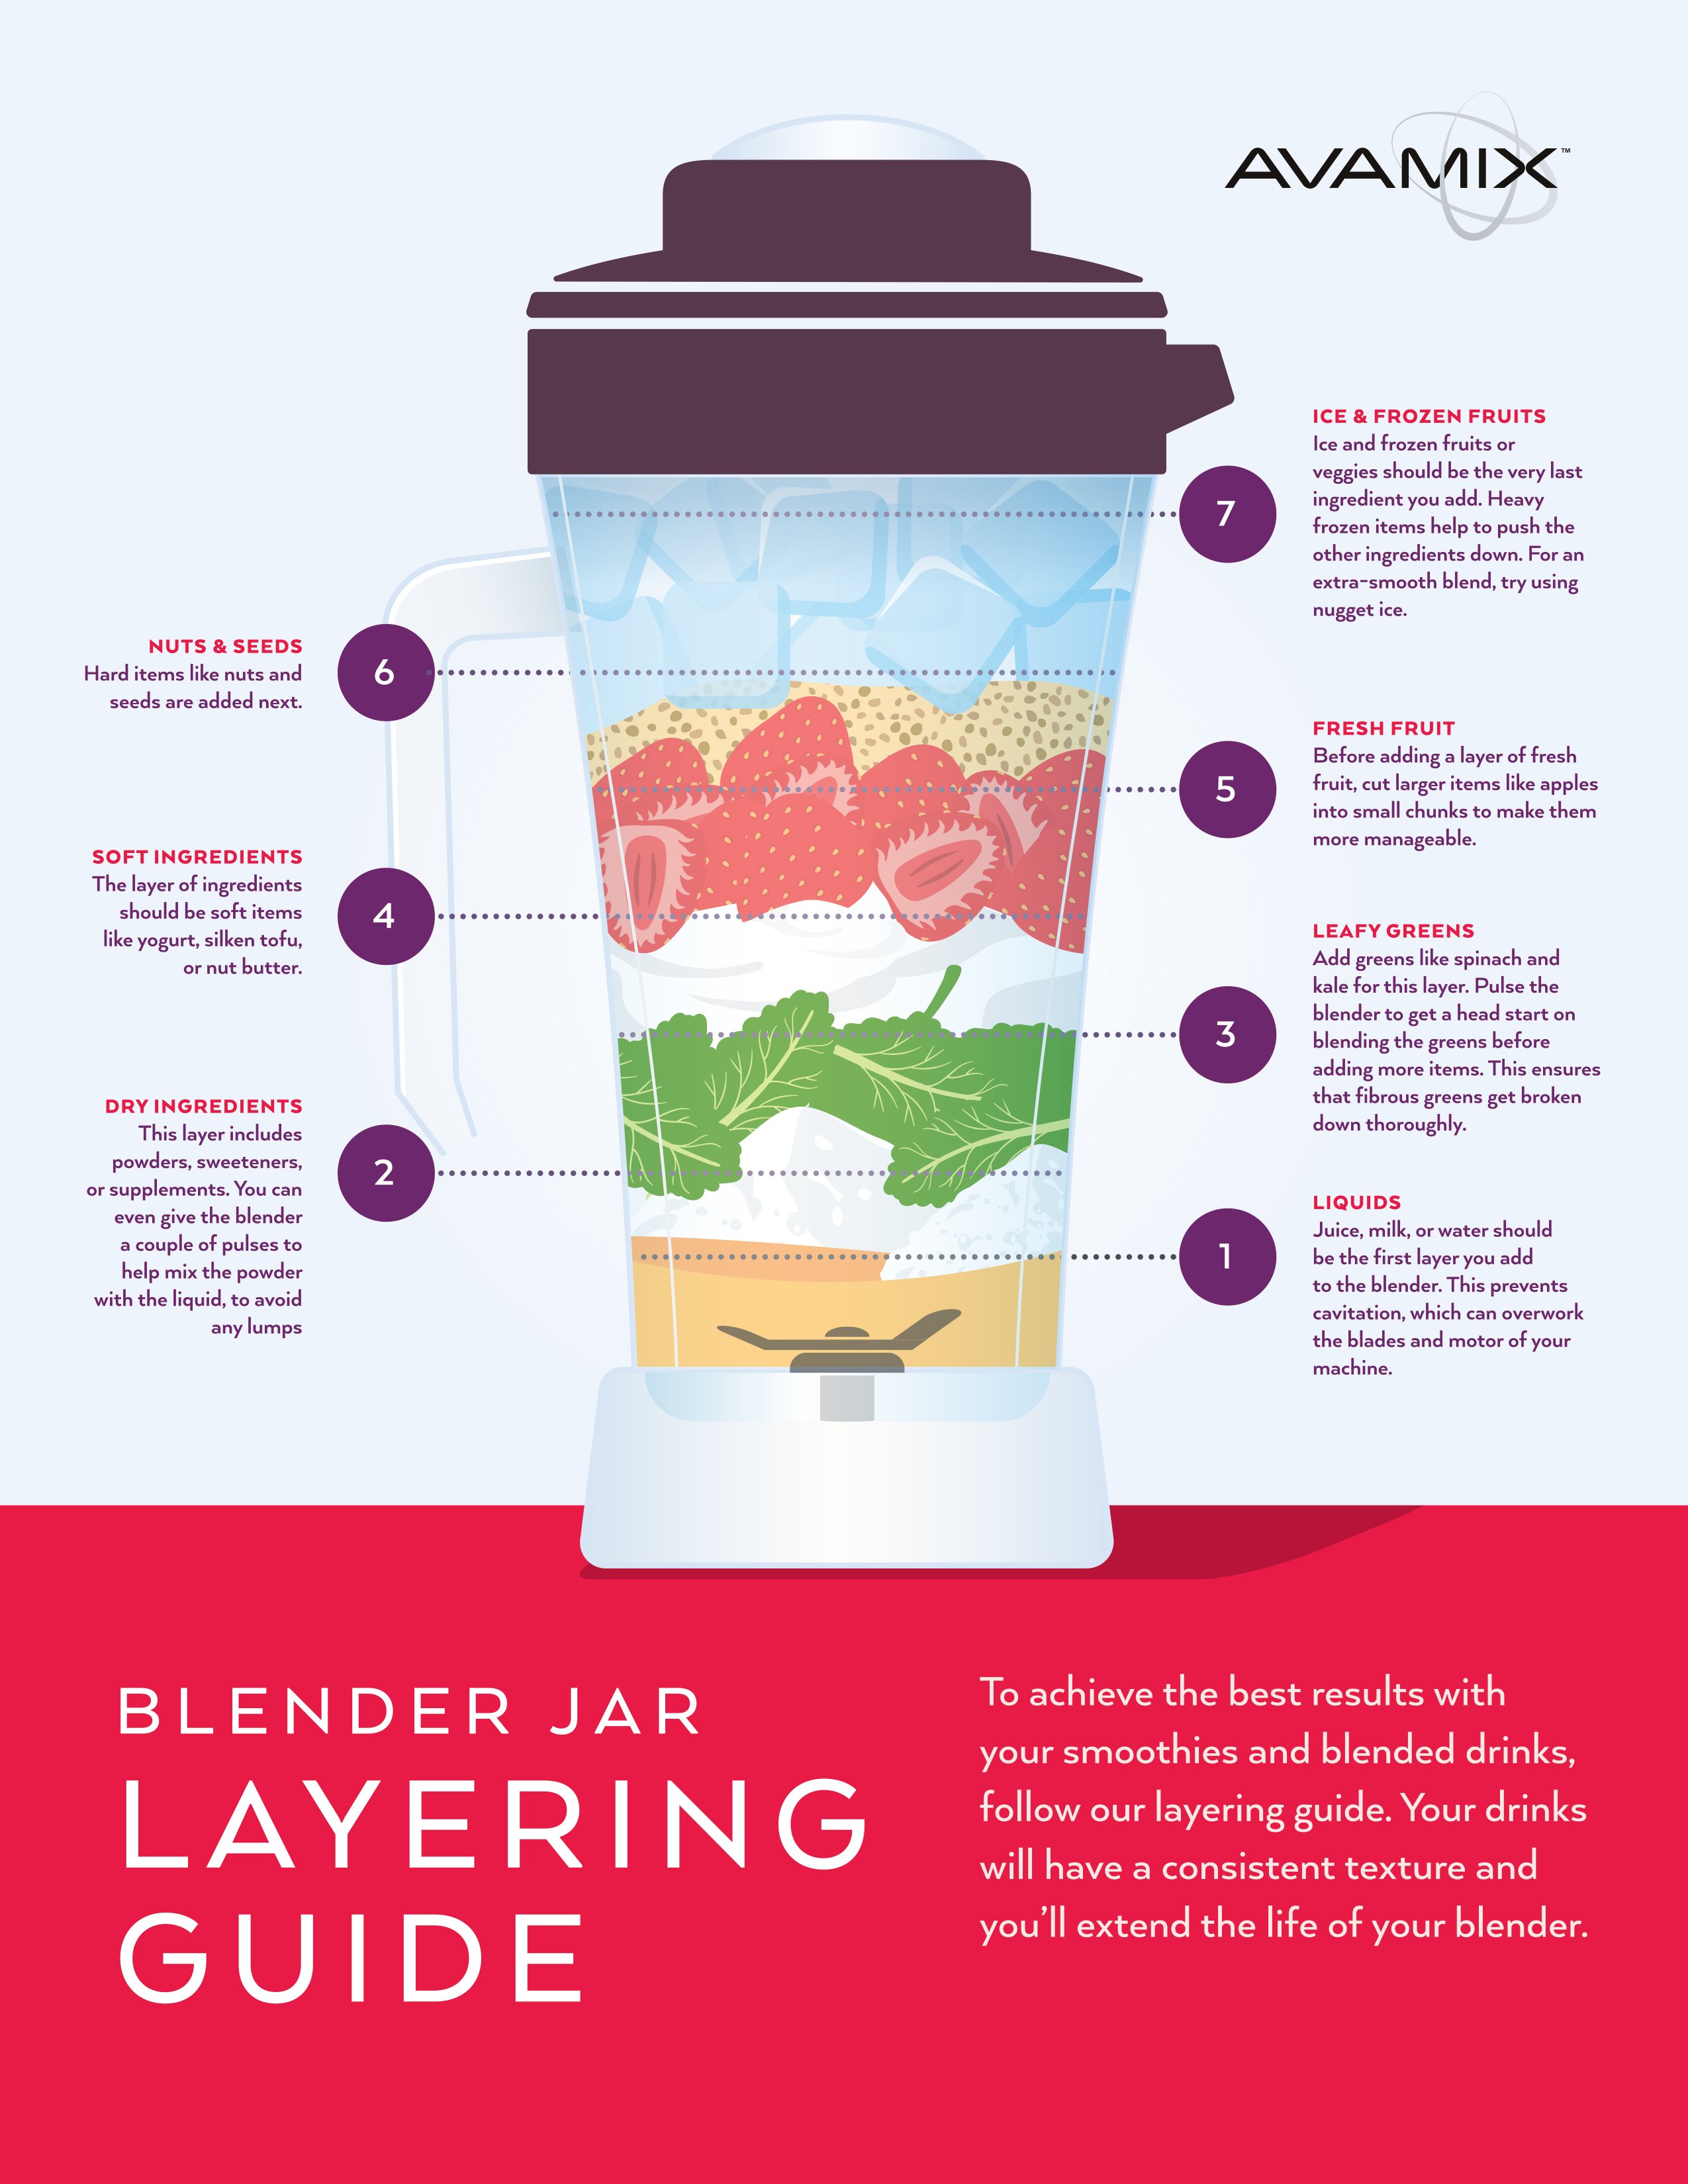
Place liquids near the bottom to facilitate initial movement of solid ingredients—this creates the lubrication needed for the vortex to form properly. When blending ice, add water first; ice floats in water allowing proper blade engagement, while without liquid, ice wedges against jar sides and melts slowly, creating dangerous strain on the motor. Cut large pieces before adding to prevent motor overload, and never add boiling ingredients directly—thermal shock can shatter glass jars. For best results, layer ingredients strategically: liquids first, then soft ingredients, with hardest items like ice or frozen fruit on top where they’ll fall into the vortex naturally.
Post-Operation Cleaning That Extends Blender Life
Proper cleaning extends your blender’s lifespan and maintains food safety standards. The process takes less than two minutes when done immediately after use, preventing the stubborn residue buildup that makes cleaning difficult later.
Component Separation Safety Protocol
Unplug the blender before separating jar from base—this simple step prevents accidental activation. Twist the jar base counterclockwise to access blades for thorough cleaning, but handle blade assemblies carefully—even dull blender blades can cause serious cuts. Never immerse the motor housing in water—wipe with a damp cloth only. Allow all components to air dry completely, preferably upside down to prevent water pooling that could damage electrical components. Check gaskets for wear or damage during each cleaning session, replacing immediately if torn or compressed, as compromised seals lead to leaks that can ruin your motor.
Blade Maintenance for Peak Performance
Inspect blades monthly for dullness or damage—most manufacturers recommend professional sharpening after heavy use to maintain optimal cutting performance. Clean between blades thoroughly using a bottle brush and warm, soapy water to remove trapped food particles that can cause odors and bacterial growth. Never place blade assemblies in the dishwasher unless specifically approved by the manufacturer, as high heat and harsh detergents can damage the temper of the steel. Proper blade care ensures your blender maintains its peak performance for years rather than months.
Texture Mastery Through Technique Control
Achieving restaurant-quality results requires understanding how different variables affect final texture. Master these techniques to create everything from chunky salsa to silky smooth soups with professional consistency.
Liquid Ratio Science for Perfect Consistency
More liquid creates thinner consistencies, while less liquid produces thicker results—this simple principle governs all blending outcomes. Start with recommended ratios (typically 1:1 for smoothies), then adjust based on your preferences. Thicker mixtures require longer blending times but produce richer textures for dips and spreads. For frozen desserts, use minimal liquid with frozen fruit for spoonable results. When making hot soups, use less liquid than cold preparations since heat expands ingredients and creates thinner textures as they cool. The key to understanding how does the blender work lies in recognizing that liquid isn’t just an ingredient—it’s the essential medium that enables the vortex formation process.
Blending Duration Guidelines for Texture Control
Shorter blending times preserve texture for salsas and pesto, while extended blending creates smoother results for soups and smoothies. Monitor progress visually through the jar—stop when desired consistency is achieved to prevent over-processing. For chunky results, pulse 3-5 times at low speed; for silky smooth textures, blend continuously at high speed for 45-60 seconds. When making nut butters or thick dips, stop every 15 seconds to scrape down the sides with a long spoon—never insert utensils while the blender is running. Mastering these timing techniques transforms amateur attempts into professional-quality results with consistent texture every time.
Your blender transforms kitchen prep from labor-intensive chopping into effortless precision through this sophisticated mechanical system. By understanding how does the blender work, you can troubleshoot problems before they occur, optimize performance for any recipe, and create consistently perfect blends that impress family and guests alike. Remember: the best blenders reward proper technique with years of reliable service and countless perfect textures—apply these insights to elevate your everyday blending from functional to phenomenal.

