
That acrid smoke billowing from your air fryer isn’t normal—it’s a distress signal from your caked heating element. When grease and food debris bake onto those coils, your appliance struggles to cook evenly, emits dangerous smoke, and could fail prematurely. Most users avoid cleaning this critical component, fearing electrical risks or accidental damage. But neglecting it guarantees worse problems: ruined meals, fire hazards, and costly replacements. The truth? You can safely restore peak performance in 30 minutes with household items—no technical skills required. This guide reveals the exact methods technicians use, tailored for your countertop model.
Why Your Heating Element Fails Early (And How to Stop It)
Your air fryer’s top-mounted heating element operates at 400°F—hotter than your oven. Daily cooking sprays launch microscopic oil droplets that carbonize on contact, forming stubborn black crust. Within weeks, this buildup insulates the coils, forcing them to overheat while food undercooks. Worst-case scenarios include persistent smoke during every use, electrical shorts from moisture trapped in debris, or permanent hot spots that burn food unevenly. The fix isn’t complicated: regular cleaning prevents 90% of premature failures. Skip this maintenance, and your $100 appliance could die before its second birthday.
Essential Safety Steps Before You Touch Anything
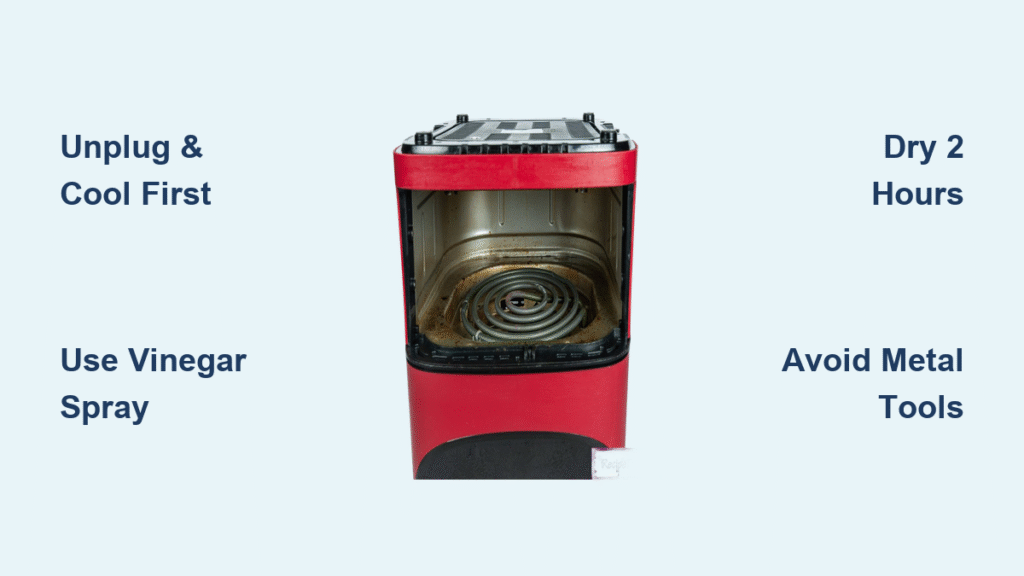
The 30-minute cooling rule is non-negotiable. Even after cooking stops, your heating element retains enough heat to cause third-degree burns. Unplug immediately post-use, set a timer, and never skip this wait. During cooling, verify complete disconnection—no lights or digital displays active. Working on a dry countertop with rubber-soled shoes prevents accidental grounding. Remember: one drop of water near electrical contacts can fry your circuit board.
Critical safety gear checklist:
– Heat-resistant gloves (for handling warm components)
– Safety glasses (debris flies unexpectedly)
– Dust mask (for heavy carbonized buildup)
– Battery-powered work light (avoid overhead water sources)
Red flags requiring professional help: Visible coil breaks, melted insulation, or sparking during operation. If you spot these, stop immediately—no cleaning attempt is worth electrical risks.
Your 5-Minute Cleaning Kit (No Metal Allowed!)
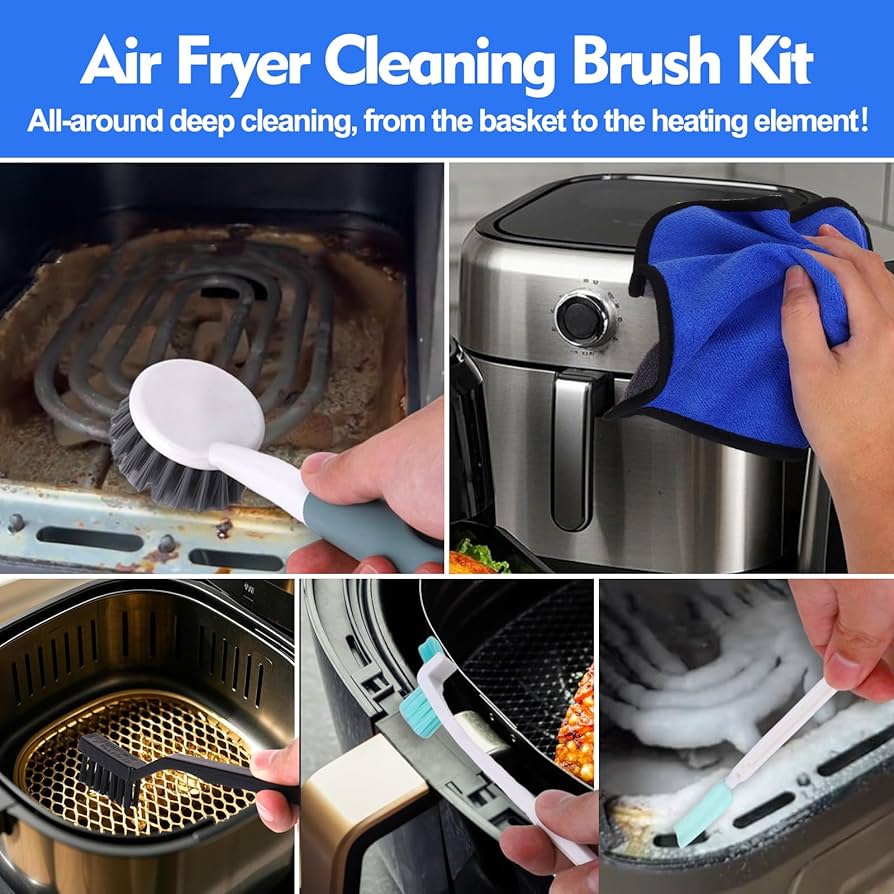
Skip the hardware store—gather these now:
– Soft toothbrush (electric toothbrush heads work best)
– 2-3 lint-free microfiber cloths
– Cotton swabs (for coil valleys)
– Wooden skewer (for stubborn debris)
– Small paintbrush (dust removal)
Never use: Steel wool, metal scrapers, or abrasive pads. One scratch creates permanent weak spots where future burns occur. Even “non-scratch” sponges can damage delicate coils over time.
Effective cleaning solutions:
– Grease killer: Equal parts white vinegar and warm water in spray bottle
– Carbon buster: 2 tbsp baking soda + 1 tsp water (thick paste)
– Daily defender: 2 drops degreasing dish soap in 1 cup warm water
Pro tip: Test solutions on a hidden area first. Some commercial degreasers damage plastic housings even when labeled “appliance-safe.”
Quick Visual Diagnosis: Is Your Element in Crisis?

Flip your air fryer upside down on a clean towel. Shine a flashlight across the coils—do you see:
– Light buildup: Thin, dusty residue (dry cleaning suffices)
– Moderate crisis: Black, flaky crust covering >30% of coils
– Emergency: Thick, tar-like carbonization or visible gaps in coils
Critical warning signs: Grease dripping from element edges, white ash deposits, or uneven glowing during use. If coils appear bent or broken, stop—you need professional replacement.
Dry Debris Removal: The Zero-Moisture Method
Start here for light-to-moderate buildup. Hold your air fryer at 45 degrees over a trash can. Using the soft toothbrush, sweep with the coil direction—not against it. Aggressive scrubbing bends coils, creating hot spots. For tight spaces, wrap a cotton swab in microfiber cloth and gently roll between coils.
Key technique: Tap the unit’s sides firmly after brushing. This dislodges hidden debris trapped beneath coils. Finish by blowing compressed air (6-inch distance) across the element. Never use your mouth—saliva introduces moisture that causes corrosion.
If dry cleaning removes >80% of buildup, skip to drying steps. For stubborn residue, advance to deep cleaning.
Vinegar Deep Clean: Dissolve Grease in 5 Minutes
Why vinegar works: Its 5% acidity breaks down oil bonds without damaging metal. Mix equal parts white vinegar and cool water in a spray bottle—hot liquid warps components. Mist coils lightly; pooling liquid risks electrical damage. Wait exactly 3 minutes for chemical action, then wipe with a barely damp microfiber cloth following coil patterns.
Critical mistake to avoid: Reusing the same cloth section. Flip or replace it every 15 seconds to prevent redepositing grease. For coil valleys, dip a cotton swab in vinegar solution and rotate gently. Rinse by wiping with a water-dampened cloth, then immediately dry with a second cloth.
Smoke warning: If vinegar smell lingers after drying, run an empty cycle at 350°F for 5 minutes. Residual acid burns off instantly.
Baking Soda Paste for Burnt-On Carbon
When to use this: For black, rock-hard buildup vinegar can’t touch. Mix 2 tbsp baking soda with 1 tsp water to form toothpaste consistency. Apply only to affected areas using a dry cloth—never fingers (skin oils worsen future sticking). Set timer for 12 minutes max; longer dries paste into concrete.
Removal technique: Dampen a second cloth with cool water and wipe in coil direction. For persistent spots, gently rub with a dry toothbrush. Check progress every 30 seconds—over-scrubbing damages coils. Rinse by wiping with a clean damp cloth, then dry thoroughly.
Never do this: Use baking soda paste on aluminum elements. It causes pitting corrosion. Check your manual first.
The 2-Hour Drying Rule That Prevents Electrical Disasters

Moisture is your #1 enemy. After cleaning, leave your air fryer upside down in a warm, dry spot for at least 2 hours—no shortcuts. Humid climates require 4 hours. To verify dryness:
– Run fingers gently along coils (cool unit only)
– Check for cool spots indicating trapped moisture
– Shine flashlight for water droplets
Critical test sequence:
1. Plug in and run empty at 350°F for 3 minutes
2. Unplug immediately and check for smoke/odors
3. If present, repeat drying process (do not use)
Persistent smoke means hidden moisture near electrical contacts—seek professional help.
Your 5-Minute Weekly Prevention Ritual
Daily habits that prevent deep cleaning:
– Wipe basket with damp cloth while warm (not hot)
– Empty crumb tray after every use
– Use 1 tsp oil max—excess sprays onto coils
Weekly 5-minute maintenance:
1. Unplug and cool for 15 minutes
2. Brush coils with dry toothbrush
3. Vacuum debris from base
4. Wipe housing with vinegar-water mix
Monthly deep clean: Perform full vinegar treatment even if buildup seems minimal. Carbonization happens invisibly.
Smoke After Cleaning? Fix It in 10 Minutes
90% of post-cleaning smoke comes from moisture. Immediately unplug and return to drying phase. If using again:
– Run empty at 400°F for 10 minutes (windows open)
– Place activated charcoal bowl inside overnight for odors
– Never use air fresheners—they coat coils with new residue
Persistent smoke means: Grease absorbed into plastic housing. Replace basket and tray, then run multiple empty cycles at increasing temperatures (200°F → 400°F).
When to Call a Professional (Before It Costs More)
DIY cleaning fails when:
– Coils glow unevenly (bright red spots)
– Element takes >5 minutes to preheat
– You smell burning without food inside
– Visible coil gaps or breaks
Cost reality: Professional element replacement costs $200-$400—more than a new unit. But regular DIY cleaning extends life 3+ years, making your 30-minute investment pay off 10x. If under warranty, contact the manufacturer—improper cleaning voids coverage.
Your air fryer’s heating element works harder than any component in your kitchen. That 30-minute monthly cleaning session prevents smoke-filled disasters, extends appliance life by years, and guarantees crispy results every time. Tonight, unplug that unit the moment dinner finishes. While it cools, grab your toothbrush and vinegar spray—you’ve got nothing to lose but next week’s burnt smell. Your perfectly golden fries (and smoke alarm) will thank you.

